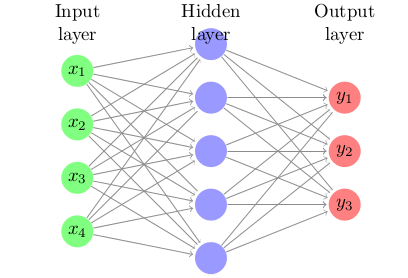
기본 Pipe-line
Step 1. Define Network
model = Sequential()
model.add(Dense(5, input_dim=2,init='glorot_uniform'))
#첫레이어는 input_dim지정 필수, glorot_uniform = Xavier Initialization
model.add(Activation('relu'))
model.add(Dense(1))
model.add(Activation('sigmoid'))
Layer Types
- Dense: Fully connected layer and the most common type of layer used on multi-layer perceptron models.
- Dropout: Apply dropout to the model, setting a fraction of inputs to zero in an effort to reduce over fitting.
- Merge: Combine the inputs from multiple models into a single model.
Step 2. Compile Network
model.compile(optimizer='sgd', loss='mse', metrics=['accuracy'])
- metrics : 학습하면서 수집하고자 하는 정보 (Loss는 기본적으로 수집)
Step 3. Fit Network
fit = Adapt the weights on a training dataset
history = model.fit(X, y, batch_size=10, epochs=100)
Step 4. Evaluate Network
loss, accuracy = model.evaluate(X, y)
# 기본은 loss, Step 2에서 Compile시 `metrics=['accuracy']`지정하였기에 accuracy도 수집 가능
print("\nLoss: %.2f, Accuracy: %.2f%%" % (loss, accuracy*100))
Step 5. Make Predictions
predictions = model.predict(x)

predictions = [float(round(x)) for x in probabilities]
accuracy = numpy.mean(predictions == Y)
print("Prediction Accuracy: %.2f%%" % (accuracy*100))
predicitons 값은 지정된 네트워크의 FC의 출력값과 동일
- Binary classification :
0or1 - Multiclass classification :
probabilitiesorargmax function을 통한 하나의 값
Step 6 Model check
mode.summary
from keras.utils.visualize_util import plot
plot(model, to_file='model.png')

from keras.utils.visualize_util import plot
plot(model, to_file='model.png')
상세 설명
1. Regular Dense, MLP type
keras.layers.core.Dense(
                output_dim,
                init='glorot_uniform',
                activation=None,
                weights=None,
                W_regularizer=None,
                b_regularizer=None,
                activity_regularizer=None,
                W_constraint=None,
                b_constraint=None,
                bias=True,
                input_dim=None
)
2. Recurrent layers, LSTM, GRU, etc.
keras.layers.recurrent.Recurrent(
                weights=None,
                return_sequences=False,
                go_backwards=False,
                stateful=False,
                unroll=False,
                consume_less='cpu',
                input_dim=None,
                input_length=None
)
- 파라미터 설명
- LSTM, GRU and SimpleRNN 등 사용 가능
3. 1D Convolution layers
keras.layers.convolutional.Convolution1D(
                nb_filter,
                filter_length,
                init='glorot_uniform',
                activation=None,
                weights=None,
                border_mode='valid',
                subsample_length=1,
                W_regularizer=None,
                b_regularizer=None,
                activity_regularizer=None,
                W_constraint=None,
                b_constraint=None,
                bias=True,
                input_dim=None,
                input_length=None
)
4. 2D Convolution layers
keras.layers.convolutional.Convolution2D(
nb_filter,
nb_row, nb_col,
init='glorot_uniform',
activation=None,
weights=None,
border_mode='valid',
subsample=(1, 1),
dim_ordering='default',
W_regularizer=None,
b_regularizer=None,
activity_regularizer=None,
W_constraint=None,
b_constraint=None,
bias=True
)
5. Autoencoder
Autoencoders can be built with any other type of layer
from keras.layers import containers

#imput shape: (nb_samples.32)
encoder = containers.Sequential([Dense(16, input_dim=32), Dense(8)])
decoder = containers.Sequential([Dense(16, input_dim=8), Dense(32)])

autoencoder = Sequential()
autoencoder.add(AutoEncoder(encoder=encoder, decoder=decoder, output_reconstruction=False))
Other types of layers include
- Dropout
- Noise
- Pooling
- Normalization
- Embedding
- and so on....
Activations
- Sigmoid, tanh, ReLu, softplus, hard_sigmoid, linear
- Advanced activations : LeakyRelu, PReLu, ELU, Parametric Softplus, Thresholded linear, Thresholded ReLu
ObJective Fucntion
- Error Loss : RMSE, MSE, MAE, MAPE, MSLE
- Hinge Loss : Squared_hinge, Hinge
- Class Loss : Binary_crossentropy, categorical_crossentropy
Optimization
- SGD, AdaGrad, AdaDelta, Rmsprop, Adam
- Alll optimizer can be customized via parameters
| Regression | Binary Classification | Muticlass Classification | |
|---|---|---|---|
| Activation | Linear | sigmoid | softmax |
| Cost Func | mse | binary_crossentropy | categorical_crossentropy |
- Keras에서 지원하는 Cost Func., Optimization algo.
Save and Load
json_string = model.to_json() # save as json
yaml_string = model.to_yaml() # save as YAML

from keras.models import model_grom_json
model = model\_from\_json(json_string) # load from json
model = model\_from\_yaml(yaml)string) # load from yaml
Model parameters(weights) save and load
model.save\_weights('my\_model\_weight.h5')
model.load\_weights('my\_model\_weight.h5')
Model Type : Sequential

- Sequential models are linear stack of layers
- The model we all know and love
- Treat each layer as object that feeds into the next


Model Type : Graph

- Optimized over all output
- Graph model allows for two or more independent networks to diverge or merger
- Allow for multiple separate inputs or outputs
- Different merging layers(sum or concatenate)

